orbi hunting 0x0: introduction, uart access, recon
- Introduction
- Overview
- Firmware 2.5.1.16 vs. 2.7.33 Changes
- UART Serial Console Access
- Recon Dump
- Wrapping Up
Introduction
I wanted to upgrade the WiFi at home a few years ago and ended up purchasing one of Netgear’s Orbi line of mesh WiFi routers. After about a year I ended doing a ‘real’ upgrade to some Ubiquiti equipment, so I had this Orbi just laying around and decided to use it as a target for bug hunting. I’ve done a bit of research against IoT devices in the past and wanted something new to look into. I’ve now been hunting on this device for about a year and half, walking away and coming back to it multiple times, and sometimes going months without doing anything with it. Over this time I’ve explored a few angles and documented quite a bit of it so I thought I’d just start dumping some of this information here, mostly in the hopes that it may be useful to anyone else in the future who may be interested in doing their own hunting on this device.
Minor disclaimer: This series of posts may be a bit disjointed and may not always provide much of a narrative. As mentioned above, it’s meant to be a data dump and not so much a walkthrough of every step I took along the way. Where possible I’ll provide context around how I came to certain conclusions, why I decided to look in a particular area, and any other information that I think may be useful to others.
Overview
System Details
- Device: Netgear Orbi (RBR20)
- Firmware Version(s):
- Architecture: ARMv7 rev 5
-
Kernel:
Linux RBR20 3.14.77 #2 SMP PREEMPT - OS: Customized OpenWRT Chaos Calmer image
Hardware Details
Basic Specs
- Processor: Quad-Core ARM Cortex-A7, Qualcomm
- Memory: 1GB RAM
- Storage: 512MB NAND flash
- Radio: 2.4Ghz + 5Ghz wireless
Board Layout and Components
I took a look at the FCC listing for this particular device and reviewing the internal photographs but soon discovered that the images on this site didn’t exactly match my device and certain components were either different brands/devices or missing entirely from the images compared to my actual device. In any case, this still provided a good point of reference that would help with getting a general understanding of where things were supposed to be.
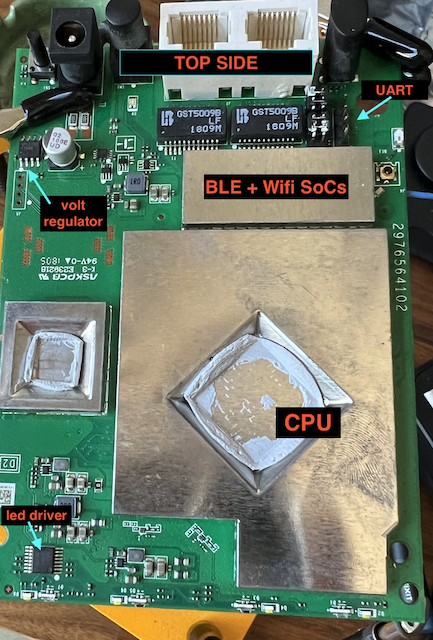
The top of the PCB exposes the following components:
- BLE + Wifi SoC
- CPU (beneath a shield)
- Voltage regulator
- RJ45 ports
- Power input
- UART pins
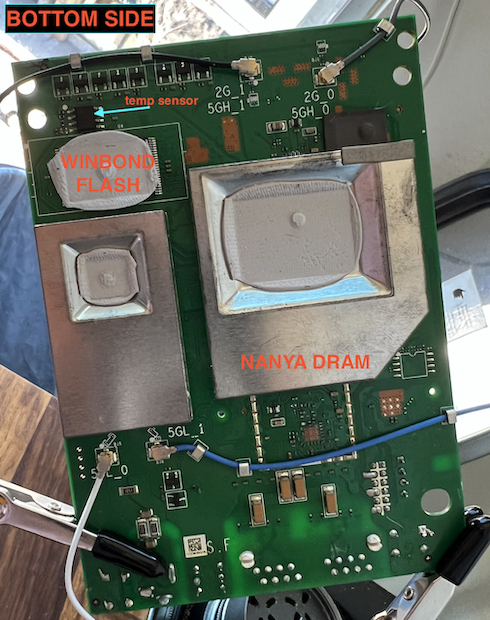
The bottom side of the PCB:
- Winbond NAND flash
- NANYA DRAM


Firmware Extraction
I used binwalk to extract the root filesystem from the firmware images provided by Netgear. This successfully extracted the embedded squashfs filesystem.
Below is a listing of the root directory from the extracted filesystem:
drwxr-xr-x  3 builder builder  4096 Feb 13 02:20 __rd_debug_only
drwxr-xr-x  2 builder builder  4096 Feb 13 02:20 bin
-rw-r--r--  1 builder builder     9 Feb 13 00:47 cloud_version
drwxr-xr-x  3 builder builder  4096 Feb 13 02:20 data
drwxr-xr-x  2 builder builder  4096 Feb 13 02:20 dev
drwxr-xr-x 33 builder builder  4096 Feb 13 02:20 etc
-rw-r--r--  1 builder builder    11 Feb 13 00:47 firmware_language_version
-rw-r--r--  1 builder builder     1 Feb 13 00:47 firmware_region
-rw-r--r--  1 builder builder    29 Feb 13 00:47 firmware_time
-rw-r--r--  1 builder builder    10 Feb 13 00:47 firmware_version
-rw-r--r--  1 builder builder    11 Feb 13 00:47 flash_type
-rw-r--r--  1 builder builder    11 Feb 13 00:47 hardware_version
lrwxrwxrwx  1 builder builder     4 Feb 13 00:47 home -> /tmp
-rw-r--r--  1 builder builder    31 Feb 13 00:47 hw_id
drwxr-xr-x 18 builder builder  4096 Feb 13 02:20 lib
lrwxrwxrwx  1 builder builder     8 Feb 13 00:47 mnt -> /tmp/mnt
-rw-r--r--  1 builder builder     6 Feb 13 00:47 module_name
drwxr-xr-x  5 builder builder  4096 Feb 13 02:20 opt
lrwxrwxrwx  1 builder builder    12 Feb 13 00:47 overlay -> /tmp/overlay
drwxr-xr-x  2 builder builder  4096 Feb 13 00:47 proc
drwxr-xr-x  2 builder builder  4096 Feb 13 02:20 rom
drwxr-xr-x  2 builder builder  4096 Feb 13 02:20 root
drwxr-xr-x  3 builder builder 12288 Feb 13 02:20 sbin
drwxr-xr-x  2 builder builder  4096 Feb 13 00:47 sys
drwxr-xr-x  2 builder builder  4096 Feb 13 02:20 tmp
drwxr-xr-x  9 builder builder  4096 Feb 13 02:20 usr
lrwxrwxrwx  1 builder builder     4 Feb 13 00:47 var -> /tmp
drwxr-xr-x 14 builder builder 57344 Feb 13 02:20 www
GPL Code
Apart from the files from extracted firmware images, I also downloaded the GPL code for each of the firmware versions I looked at. Download links for these packages can be found on this page for Netgear, though most vendors provide these packages as required by the license. They include source code all GPL code they use and/or modified to create the system.
The majority of the custom code/interesting files are located under the git_home directory of the extracted archive (which is an OpenWrt buildroot directory).
Note: While having vendors provide their modified code sounds great in theory, the reality is a little different. For example, the GPL packages for the Orbi include a lot of source code, but specific open source applications they made modified copies of are given in binary form only.
Firmware 2.5.1.16 vs. 2.7.33 Changes
There are a couple of important things that changed between these two firmware versions that I want to mention here.
(Easy) Telnet Access Removed
First, in the older version it was possible to enable Telnet access via the hidden debug page at http://<orbi>/debug_detail.htm when logged in as the admin user. This was removed in the later version and it is no longer trivial to enable Telnet. There does appear to still be Netgear’s custom Telnet server telnetenable that listens on UDP port 23 and will only “activate” upon receiving a ‘magic’ packet containing username/pass and other info in a specific format (see here).
The code for this binary is included in the GPL packages. Version 2.5.x seems to have only allowed the use of this feature if the Region was set to Chinese and the Region file contained “WW” (shown below). The 2.7.x version doesn’t include this check and simply compares the received data against a local version it constructs (the main server loop is shown below):
	for (;;) {
		FD_ZERO(&readable);
		FD_SET(fd, &readable);

		if (select(fd + 1, &readable, NULL, NULL, NULL) < 1)
			continue;

		slen = sizeof(struct sockaddr_in);
		r = recvfrom(fd, rbuf, sizeof(rbuf), 0, (struct sockaddr *)&from, &slen);
		if (r < 1)
			continue;

		datasize = fill_payload(output_buf);
		if (r == datasize && memcmp(rbuf, output_buf, r) == 0) {
			/* maybe it's better to judge whether utelnetd is running in real time here */
			if (telnet_enabled == 0) {
				printf("The telnet server is enabled now!!!\n");
				system(TELNET_CMD);
				telnet_enabled = 1;
			}
			sendto(fd, ack, 3, 0, (struct sockaddr *)&from, slen);
		}
	}
Even so, I’ve yet to successfully enable Telnet even when using known-good credentials with either the telnet version linked above or my own customized version of the code included in the GPL packages.
Binaries in GPL Packages Stripped
The earlier version of GPL code package provided binaries that had not been stripped of debug symbols, making reverse engineering of these specific applications much easier. They’re still useful for reversing newer binaries though as most functions are still intact and knowing exactly what everything should be called always helps.
The paths to some of these binaries are provide here (these are paths on the root filesystem of the device):
/usr/sbin/net-cgi
/usr/sbin/soap-api
/usr/sbin/miniupnpd
UART Serial Console Access
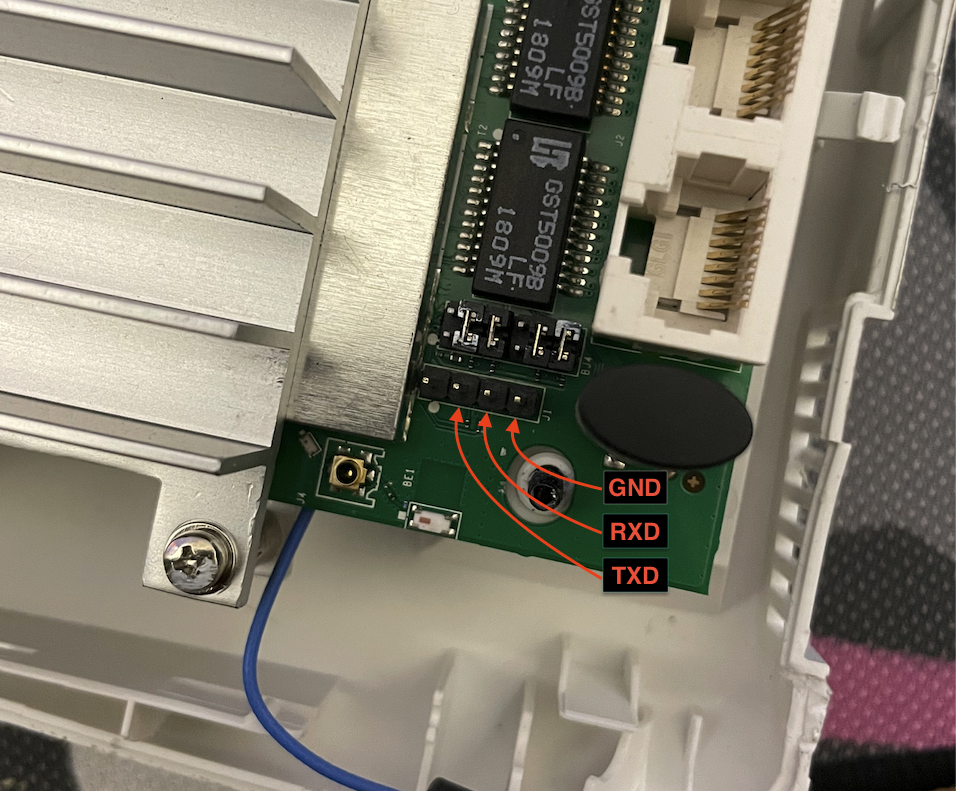
After losing Telnet access when my device was inintentionally upgraded, I moved on to seeing if I could get access to a console over serial. My device still had pins connected as shown below so this immediately caught my attention as being a potential serial interface. I found info online for other Orbi models that showed the correct pin layout.
Starting with the pin closes to the RJ45 port:
GND, RX, TX, power (not needed)

I connected to these pins on the board using an FTDI serial-USB converter in the 3.3v configuration at 115200 baud (8N1) and successfully dropped into a root shell.
Bonus: GreatFET ONE UART Setup
After confirming this worked with the FTDI converter, I decided to use my GreatFET ONE board moving forward. This is an interesting hardware hacking tool I bought some time ago to begin experimenting with USB fuzzing/analysis. It allows for USB proxying and emulation of various USB devices (keyboard, storage, etc) through a programmatic interface using Python.
I remembered that it can also be used for serial/UART connections but had a difficult time finding any good documentation or examples of doing this. Eventually, I was able to get this working by connecting pins to the following ports on the GreatFET’s J1 bank of I/O pins (see full pin table here):
1:GND33:RX34:TX
I then used the built-in UART script provided by the greatfet library/CLI tool:
greatfet uart --wait -P none -N
Recon Dump
boot log highlights
CPU Info:
Booting Linux on physical CPU 0x0
Linux version 3.14.77 (lijun.xue@cnshadnicp03.deltaos.corp) (gcc version 5.2.0 (OpenWrt GCC 5.2.0 r6043) ) #1 SMP PREEMPT Fri Jun 4 19:11:51 CST 2021
CPU: ARMv7 Processor [410fc075] revision 5 (ARMv7), cr=10c5387d
CPU: PIPT / VIPT nonaliasing data cache, VIPT aliasing instruction cache
Machine model: Qualcomm Technologies, Inc. IPQ40xx/AP-DK04.1-C1
PERCPU: Embedded 8 pages/cpu @dfbc7000 s8448 r8192 d16128 u32768
Built 1 zonelists in Zone order, mobility grouping on.  Total pages: 125952
Kernel memory layout:
Virtual kernel memory layout:
    vector  : 0xffff0000 - 0xffff1000   (   4 kB)
    fixmap  : 0xfff00000 - 0xfffe0000   ( 896 kB)
    vmalloc : 0xe0800000 - 0xff000000   ( 488 MB)
    lowmem  : 0xc0000000 - 0xe0000000   ( 512 MB)
    pkmap   : 0xbfe00000 - 0xc0000000   (   2 MB)
    modules : 0xbf000000 - 0xbfe00000   (  14 MB)
      .text : 0xc0208000 - 0xc073e1fc   (5337 kB)
      .init : 0xc073f000 - 0xc076a100   ( 173 kB)
      .data : 0xc076c000 - 0xc07abb38   ( 255 kB)
       .bss : 0xc07abb38 - 0xc0804680   ( 355 kB)
SLUB: HWalign=64, Order=0-3, MinObjects=0, CPUs=4, Nodes=1
Preemptible hierarchical RCU implementation.
System Users
root@RBR206:/# cat /etc/passwd
root:$5$BChRWDkyPlaOVrGS$/kQaqSCIWiiM36IuwS5phJHhpzdnP9osEVONs4CZa3C:0:0:root:/tmp:/bin/ash
guest:*:65534:65534:guest:/tmp/ftpadmin:/bin/ash
nobody:*:65534:65534:nobody:/var:/bin/false
daemon:*:65534:65534:daemon:/var:/bin/false
admin:x:1:1:Linux User,,,:/tmp/ftpadmin:/bin/ash

root@RBR206:/# cat /etc/shadow
guest::10957:0:99999:7:::
admin:$1$QPu5pxAi$ITZQ21EZg7P2B48TsiQwg1:18612:0:99999:7:::
Listening Processes (netstat -lp)
root@RBR20:/# netstat -lp
Active Internet connections (only servers)
Proto Recv-Q Send-Q Local Address           Foreign Address         State       PID/Program name
tcp        0      0 10.13.13.1:7272         0.0.0.0:*               LISTEN      15890/circled
tcp        0      0 0.0.0.0:www             0.0.0.0:*               LISTEN      8278/lighttpd
tcp        0      0 0.0.0.0:domain          0.0.0.0:*               LISTEN      16137/dnsmasq
tcp        0      0 0.0.0.0:https           0.0.0.0:*               LISTEN      8278/lighttpd
tcp        0      0 :::www                  :::*                    LISTEN      8278/lighttpd
tcp        0      0 :::56688                :::*                    LISTEN      7298/miniupnpd
tcp        0      0 :::domain               :::*                    LISTEN      16137/dnsmasq
tcp        0      0 :::https                :::*                    LISTEN      8278/lighttpd
udp        0      0 10.13.13.1:38407        0.0.0.0:*                           7298/miniupnpd
udp        0      0 10.13.13.1:23           0.0.0.0:*                           12782/telnetenable
udp        0      0 0.0.0.0:domain          0.0.0.0:*                           16137/dnsmasq
udp        0      0 0.0.0.0:bootps          0.0.0.0:*                           2646/udhcpd
udp        0      0 0.0.0.0:tftp            0.0.0.0:*                           8334/tftpd-hpa
udp        0      0 0.0.0.0:1900            0.0.0.0:*                           7298/miniupnpd
udp        0      0 0.0.0.0:45226           0.0.0.0:*                           5777/net-scan
udp        0      0 10.13.13.1:5351         0.0.0.0:*                           7298/miniupnpd
udp        0      0 :::domain               :::*                                16137/dnsmasq
Mount Points
root@RBR20:~# mount
rootfs on / type rootfs (rw)
/dev/root on /rom type squashfs (ro,relatime)
proc on /proc type proc (rw,nosuid,nodev,noexec,noatime)
sysfs on /sys type sysfs (rw,nosuid,nodev,noexec,noatime)
tmpfs on /tmp type tmpfs (rw,nosuid,nodev,noatime)
overlayfs:/tmp/overlay on / type overlayfs (rw,relatime,lowerdir=/,upperdir=/tmp/overlay)
tmpfs on /dev type tmpfs (rw,nosuid,relatime,size=512k,mode=755)
devpts on /dev/pts type devpts (rw,nosuid,noexec,relatime,mode=600)
debugfs on /sys/kernel/debug type debugfs (rw,noatime)
ubi0:vol_ntgr on /tmp/mnt/ntgr type ubifs (rw,relatime)
ubi0:vol_arlo on /tmp/dal type ubifs (rw,relatime)
ubi0:vol_devtable on /tmp/device_tables type ubifs (rw,relatime)
ubi0:vol_circle on /tmp/mnt/circle type ubifs (rw,relatime)
Web Servers
Web servers will be discussed in further detail in a future post but for now I’ll just cover some of the basics.
The following binaries provide an HTTP server or otherwise involved in handling HTTP-formatted requests.
/usr/sbin/lighttpd
/usr/sbin/net-cgi
/usr/sbin/soap-api
/www/cgi-bin/proccgi
- lighttpd is the main user-facing web server process the handles requests, mostly wraps around net-cgi
-
net-cgi handles the bulk of admin functionality that reads underlying system configs and makes config changes
- net-cgi responses are typically embedded within responses returned by lighttpd within iframes or as raw data written back to the FD.
-
soap-api is the binary called by the CGI handler to handle SOAP requests. All requests to
/soapapi.cgior/soap/server_saare routed to this binary. It is a CGI application that reads most of the request data from environment variables (it expects that parent process to set all of this up prior to spawning soap-api).
Only the following pages are accessible prior to authentication:
/unauth.cgi
/passwd_reset.cgi
/basic_home_result.txt
/debuginfo.htm
Wrapping Up
Okay, that was a ton of info.
As mentioned above, future posts will dive deeper into specific areas of interest and include some of my findings in these areas.